Zotero in Ubuntu 10.04
May 26th, 2010
This saved my life! I’m currently writing my dissertation, and Zotero offers Linux users (like me) a handy solution to manage bibliographical references. This Firefox plugin allows grabbing bibliographic entries from libraries websites and portals (such as WorldCat). Zotero’s website also provides a plugin for OpenOffice integration, the default office suite in Ubuntu. I think this is currently the best solution in the world of F/OSS for managing and (new since version 2.0) sharing bibliographical references. The newest version can store your entries in a server, in order to maintain them synchronized. They can be also made public or shared with specific groups.
Installing Zotero
Zotero is a Firefox plugin. Before installing it in Ubuntu, you have to install a the Sun Java 6 plugin, which is not installed by default in Ubuntu. You need to have the partner repository enabled (read here if you don’t know what this is). Type in Terminal:
sudo apt-get install sun-java6-plugin
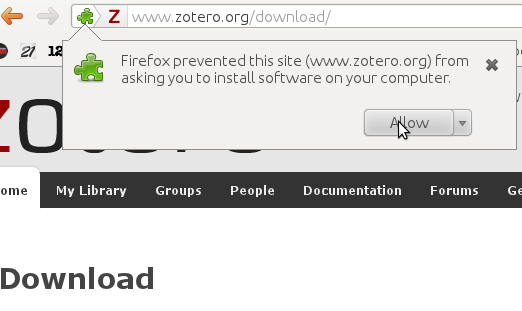
It will request to agree to the licensing terms. Once installed, you need to navigate to the Zotero homepage (http://www.zotero.org/) using Firefox, and follow the “Download” link. Firefox will then ask if you want to let the site to install software, so allow it to do so.
After the installation, you will be asked to restart Firefox. Once restarted, you will be able to see Zotero at the bottom status bar.
OpenOffice integration
The integration with OpenOffice is a second Firefox plugin that you can also download from the Zotero’s website. Before you install it, plase make shure that the right Java version is selected in the configuration of OpenOffice. Go to Tools> Options and select the Java entry under OpenOffice.org. Select the Sun Java 6 JRE if it’s not selected. It should look something like this:

Once the Java settings look right, you can install the second plugin in Firefox to make the integration. The link to the plugin location is:
http://www.zotero.org/support/word_processor_plugin_installation#openoffice_neooffice
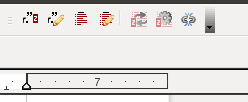
After installing and restarting both programs, OpenOffice should have this group of buttons that will allow you to manage your references:
Troubleshooting
If you receive a message saying that OpenOffice cannot communicate with Firefox, probably it has to do with the Java version you are using by default. This issue appears when you are using the open version of Java distributed through the official Ubuntu repositories. If you have this problem, run in terminal:
sudo update-java-alternatives -l
If you see this:
java-6-openjdk 1061 /usr/lib/jvm/java-6-openjdk

java-6-sun 63 /usr/lib/jvm/java-6-sun
you should change your default Java version to the second one. In order to do that, run:
sudo update-alternatives --config java
and select the correct one from the choices shown. The output of this command goes like this:
There are 2 choices for the alternative java (providing /usr/bin/java).
Selection Path Priority Status
------------------------------------------------------------
0 /usr/lib/jvm/java-6-openjdk/jre/bin/java 1061 auto mode
1 /usr/lib/jvm/java-6-openjdk/jre/bin/java 1061 manual mode
* 2 /usr/lib/jvm/java-6-sun/jre/bin/java 63 manual mode
Press enter to keep the current choice[*], or type selection number:
You need to select the java-6-sun version as shown above. Good luck!
In order to connect to the U drive, you need to install some packages:
vpnc (the vpn client)
network-manager-vpnc (a graphic front end for the connection)
smbfs (tools to mount remote drives using samba)
In the terminal, type:
sudo apt-get install vpnc network-manager-vpnc smbfs
Once you installed those packages, you can use the network manager menu in order to configure your connection. Right-click at the network manager icon and select “Edit connections”.

There you select the VPN tab, and hit the button “Add”.

Then a new window appears asking which type of connection you want to create, the Cisco Compatible VPN (vpnc) should be your default option. Hit “Create”.

In the new window, we need to enter the account information in the following manner:
Connection name: CUNY – GC (you can choose any name you want)
Gateway: vpn.mgt.gc.cuny.edu
Group name: vpnusers

The user password is the same you use to log on into the GC computers and the GC e-mail. The group password you can ask at the Help Desk (at the Meena Rees Library basement, bring your student I.D.). In the user name field put your user name (usually your firt initial and your last name) and in the domain field put “gc”. Hit o.k., you should be set. Now click once with the left button of your mouse, and select VPN Connection > CUNY – GC.
Connecting to the U drive.
If you open the file browser Nautilus, you can write the path to your drive in the address bar:
smb://wf1a.acad.gc.cuny.edu/<your group>/<your user name>
Depending on which department you are, you will be under one of the following folders: humanitiesu, socialsciencesu, sciencesu, staffu, etc. For example, I’m in Humanities, and my path is:
smb://wf1a.acad.gc.cuny.edu/humanitiesu/<my user name>
Now, in order to edit files remotely it is necessary to change the workgroup in the samba configuration file:
sudo cp /etc/samba/smb.conf /etc/samba/smb.conf.original #make a backup just in case.
gksudo gedit /etc/samba/smb.conf #open the samba configuration file for editing
In line 38 of the file, change the following:
workgroup = MSHOME
to:
workgroup = GC
More
I recommend to visit the vpnc page for more information.
It is recommendable to check the source provided by the Graduate Center. Although it is still outdated (the domain is no longer ACAD), the .pcf file has important information about the connection.